By Cathy Dew
As your SharePoint installation grows, so will your document management responsibilities. Creating a company wide Information Management Policy will soon be on the top of your list. If it’s just cleaning up large document libraries and document centers, promoting the archiving of documents in a records center or simply applying document retention policies to your existing document ecosystem, it all starts with your Information Management Policies and the rules you create to manage your document lifecycles.
Microsoft defines Information Management Policy as:
An information management policy is a set of rules for a type of content. Information management policies enable organizations to control and track things like how long content is retained or what actions users can take with that content. Information management policies can help organizations comply with legal or governmental regulations, or they can simply enforce internal business processes.
Let’s focus on the first sentence of that definition: An information management policy is a set of rules for a type of content. Your content can actually be a site collection, a content type, a list or a library. We’ll just focus on documents (which are a built-in content type). The rules are the enforcement of your company’s retention policies, auditing needs, document stages and document lifecycles. Together these parts encompass your Information Management Policies.
There are four basic predefined policy features that SharePoint provides you as a starting point for your Information Management Policy:
- Retention
- Auditing
- Barcodes
- Labels
To keep this post short, we’ll only deal with retention and moving older files into your Records Center today.
Building a retention policy is important for all companies, even those not under State / Federal Regulation oversite. Keeping “everything” may seem like a safe option but by not having a document retention policy that appropriately expires and removes older documents opens your company to legal investigation / discovery exposure that can drive up the cost of defending your company from lawsuits. So let’s go with a simple scenario where you want to move all documents older than 5 years to a record library and then after 10 years delete them.
There is quite a bit of infrastructure setup in order to get the retention policy working so hold on to your browser as we zip through some require pre-requisite steps needed to build the full retention rules outlined.
Record Center Managers
Log into your Office365 Admin Center (or on premise Active Directory Management Tool) and create a new Security Group, e.g. “Record Center Managers”. Add all the users that will be responsible for assisting with organizing files in the records center.
Records Center
So you have one? Probably not, that’s why you’re here. You’ll need to login into your SharePoint Online (or on premise) Admin Center and create one.
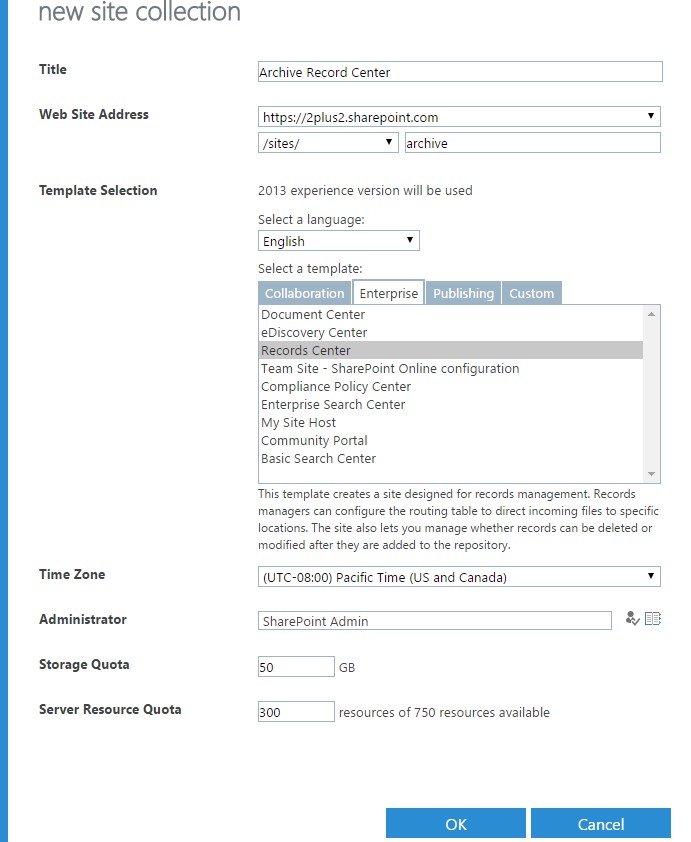
Once the new record center is built, you need to verify the settings for the Drop Off Library, which will be receiving the expired documents.
Go to your Record Center and open up the Site Settings -> Site Administration -> Content Organizer Settings. Add the new Records Center Managers security group to the Rules Managers.

And copy and paste the Web service URL to a temp location for use later.

Creating a Connection
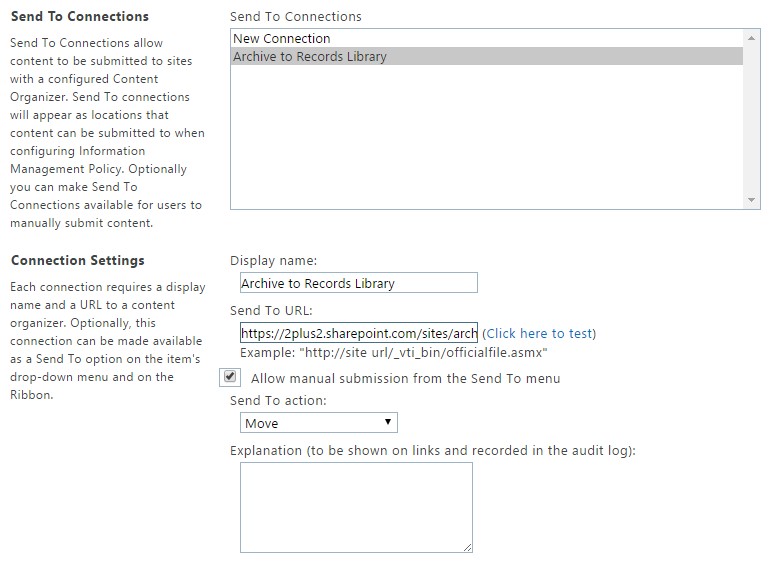
Go to your SharePoint Admin Center and select Records Management. We will now create a connection for the new Records Center in order for our retention policy to move expired documents to the Records Center.
Give the connection a name, which you find it by later. And copy and paste the Content Organiz
er URL saved earlier into the “Sent To URL” text field. We recommend that you enable manual submission from the Send To menu to allow your users to move documents early to the records center.
Click save and we’ll move on to building and configuring your content syndication hub. Don’t fret we are getting closer to the goal.
Content Syndication Hub
Because you are creating retention policies, which by definition act on the create or update date of a document, you need to create a custom content type derived from the default Document Content Type. This is because Microsoft will not allow you access to the Create Date or Update Date of the default Document Type. Additionally, since you will have more than one Site Collection – even with a small SharePoint Site – you want to keep all your site collections in sync with any new content types you create. Therefore, you want to start with a Content Syndication Hub and create your new custom content types there first.
If you are working with SharePoint Online, you already have a Content Syndication Hub created for you with your tenant setup. You won’t see this site collection in your SharePoint Admin Site Collection Listing. You’ll find it at:
https://<tenant name>.sharepoint.com/sites/contentTypeHub
If you are an on premise SharePoint installation, you’ll need to create a new site collection just to be your content syndication hub. It doesn’t matter which site collection template you use, but the Team Site Template is a good base for any custom site collection usage. Once you create a new site collection activate the Content Type Publishing by going to Site Settings -> Site Collection Administration -> Site Collection Features and activate the Content Type Syndication Hub feature.

Next we’ll create a Custom Content Type and publish it.
Custom Content Type
While still on your Content Type Hub Site collection, go to Site Settings -> Web Designer Galleries -> Site content types. And click the create button. Complete the new Content Type form, making sure to select Document Content Types -> Document as the Parent Content Type.
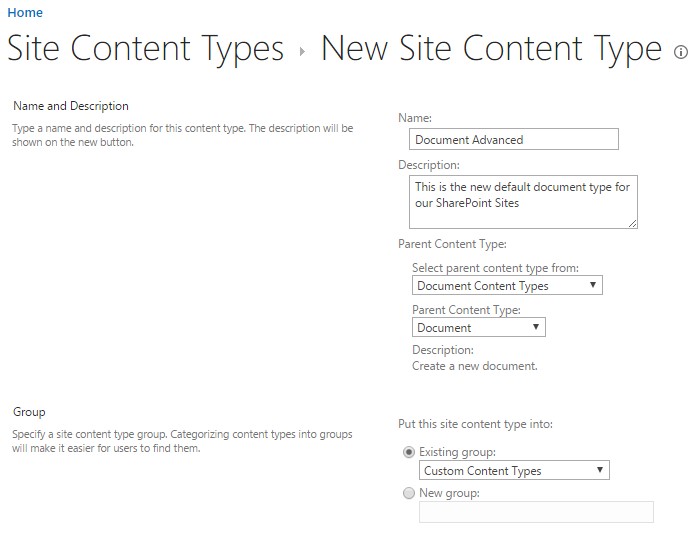
Click Ok and save the new content type. When you are returned to the Site Settings -> Site Content Types page, click on the new Content Type and open it for editing. Then click on the Information Management Policy Settings link. Complete the description and statement sections of the form and then check the box next to Enable Retention.
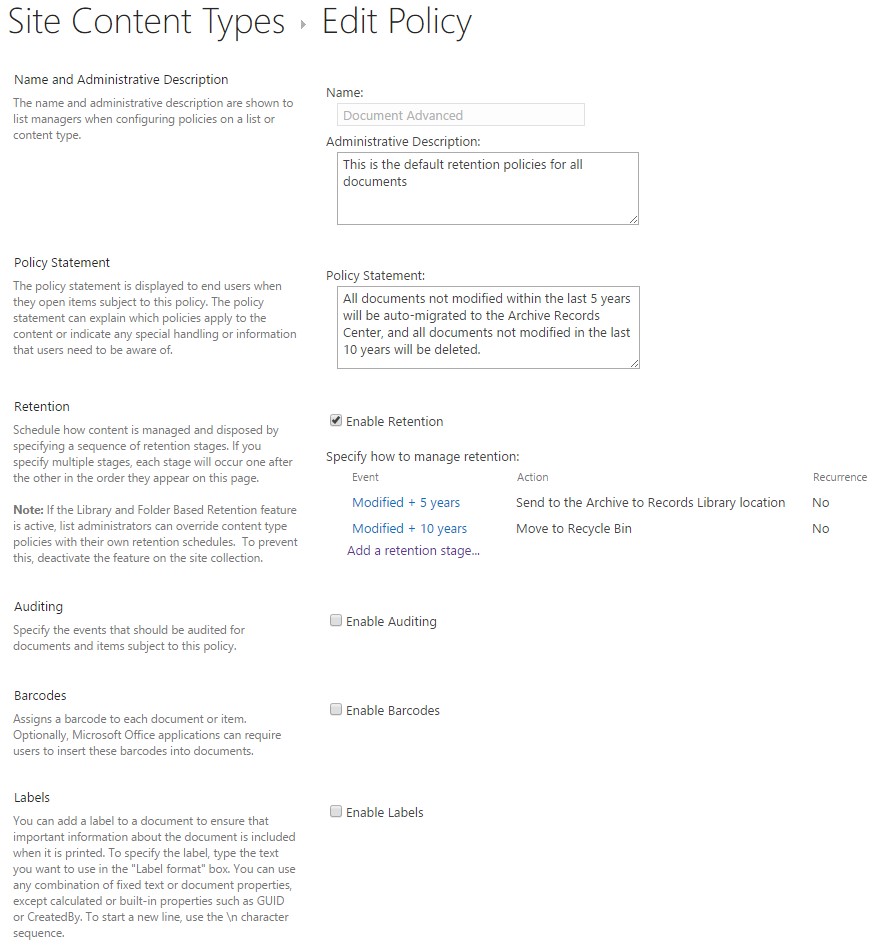
We will add two retention stages to this new content type. Click on the Add Retention Stage link and complete the form.
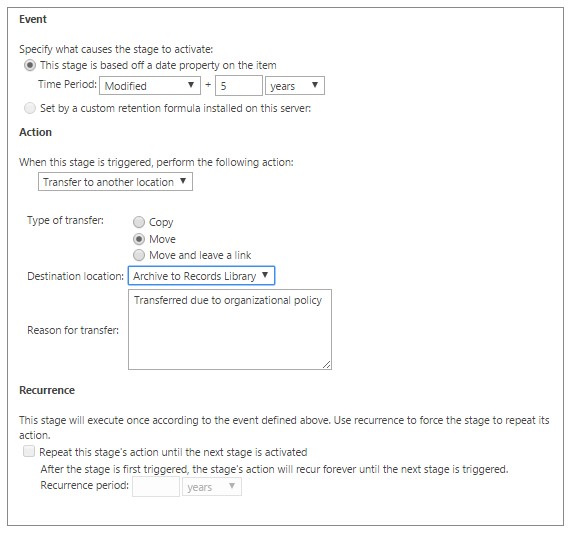
Make sure you select Modified and then enter “5” years into the time period options. For the Action, select “Transfer to another location”, Move as the transfer type, and the destination should be your new Records Library connection created previously.
You don’t need this stage to repeat so, click OK and save your new rule.
Repeat this for a + 10 year from last modified date.
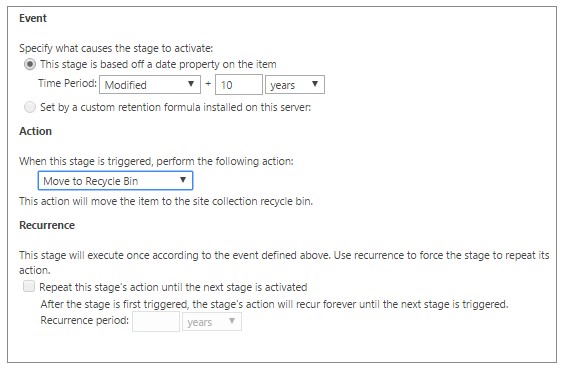
This time select move to Recycle Bin instead of move. And save your rule by clicking Ok. Make sure you click OK while on your New/Edit Policy page and save your new policies.
Now we need to publish our custom content type so it can be picked up by our other site collections. After saving your work, you should be returned to the Site Content Type page, where you need to click the “Manage publishing for the content type” link.

By default, you will have Publish selected, and the Publishing History will be blank. Click the OK button to publish your new Content Type from the Syndication Hub. If you make any changes to this content type in the future, return to this screen and select Republish, so that all your site collections receive the latest copy of the updates.
Refreshing your Content Type Subscriptions
Once your new content type is created you need to send that content type to all of your current site collections. The process is the same for all site collections, we’ll use the new Records Center as the example.
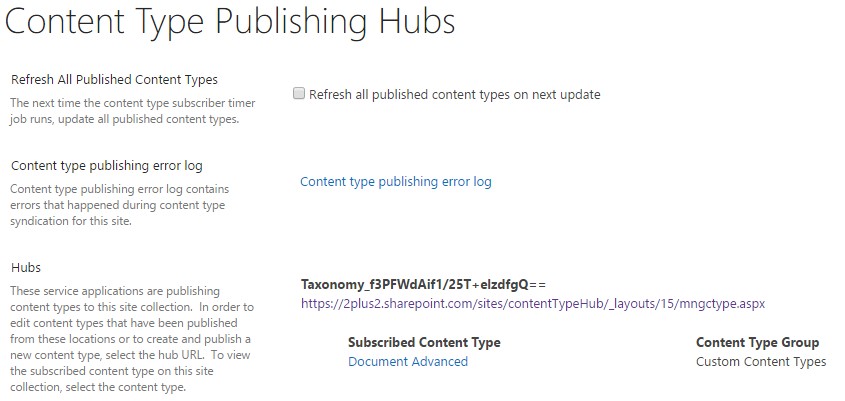
Return to your Records Center and pull in the new Content Type for use with the Content Organizer. Once at your Records Center, go to Site Settings -> Site Collection Administration -> Content type publishing. You should see that your Records Center is setup to pull content types from your Syndication Hub, but the subscribed content area is blank. Click on the “Refresh all published content types on next update” check box and click Ok. This will pull in your new Document content type.
Setting your new Content Type as Default for a Site Collection Library
You’ll want your user base to begin using your new content type, and you’ll need to set the new content type as the default for your site collection libraries. We’ll show you how this is done manually, and in a later blog post we’ll discuss global options for changing your SharePoint setup.
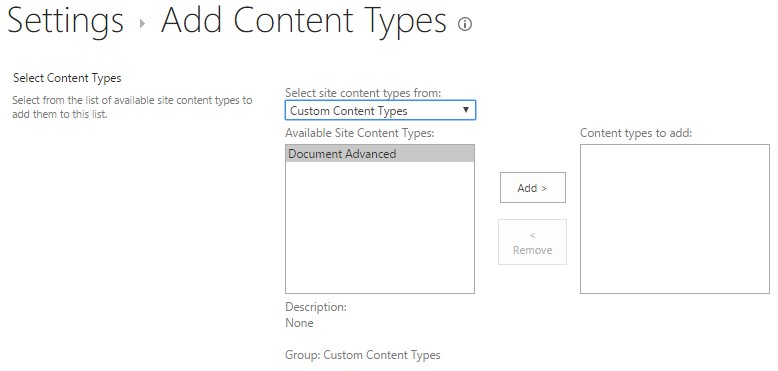
Open up your Document Library Settings and scroll down to the Content Types section:
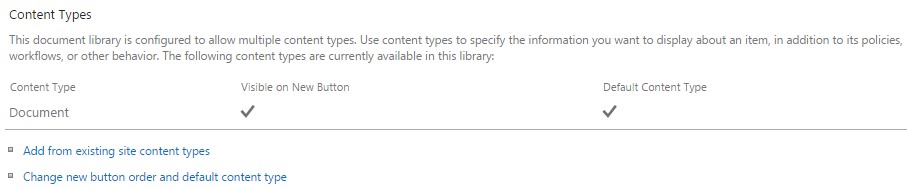
First we need to add the new Document Advanced content type, so click on “Add from existing content types”. Change the select site content types from drop down to “Custom Content Types”, and add the Document Advanced to the right panel.
Click the OK button to accept the changes and you’ll be returned to the Library -> Settings page. Now scroll back down and click the “Change new button order and default content type”. Our recommendation is to hide the default document content type and make the new document advanced the only visible one, and first on the list:
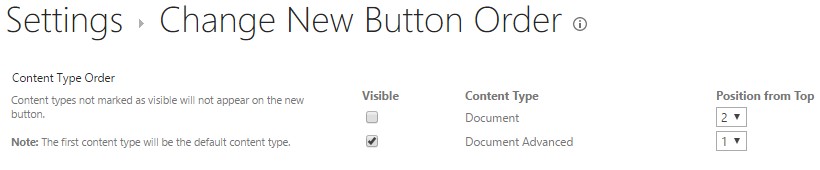
Click OK to save your changes.
Building your Content Organizer Rules
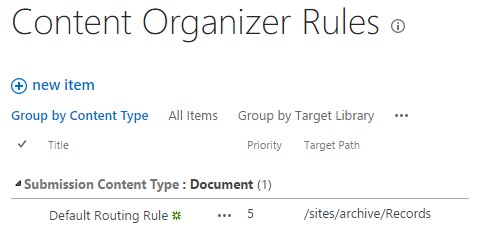
With all of that behind us, you can now build a content type routing rule to move your documents from the Drop off Folder to a target Record Library. From the Home page of the Records Center, click on the Settings Menu and select “Manage Records Center”. Under Setup Tasks and File Plan Creation, look at Step #3 and click “Create content organizer rules”. Then on the Content Organizer Rules page, click the New Item link.
Complete the form, here a few important notes for first time users:
- Make sure you select the standard Document content type here.
- Make sure you add a “*” for catch all of all other document types.
- We are not going to add any additional rules at this time, this is just the basic setup.
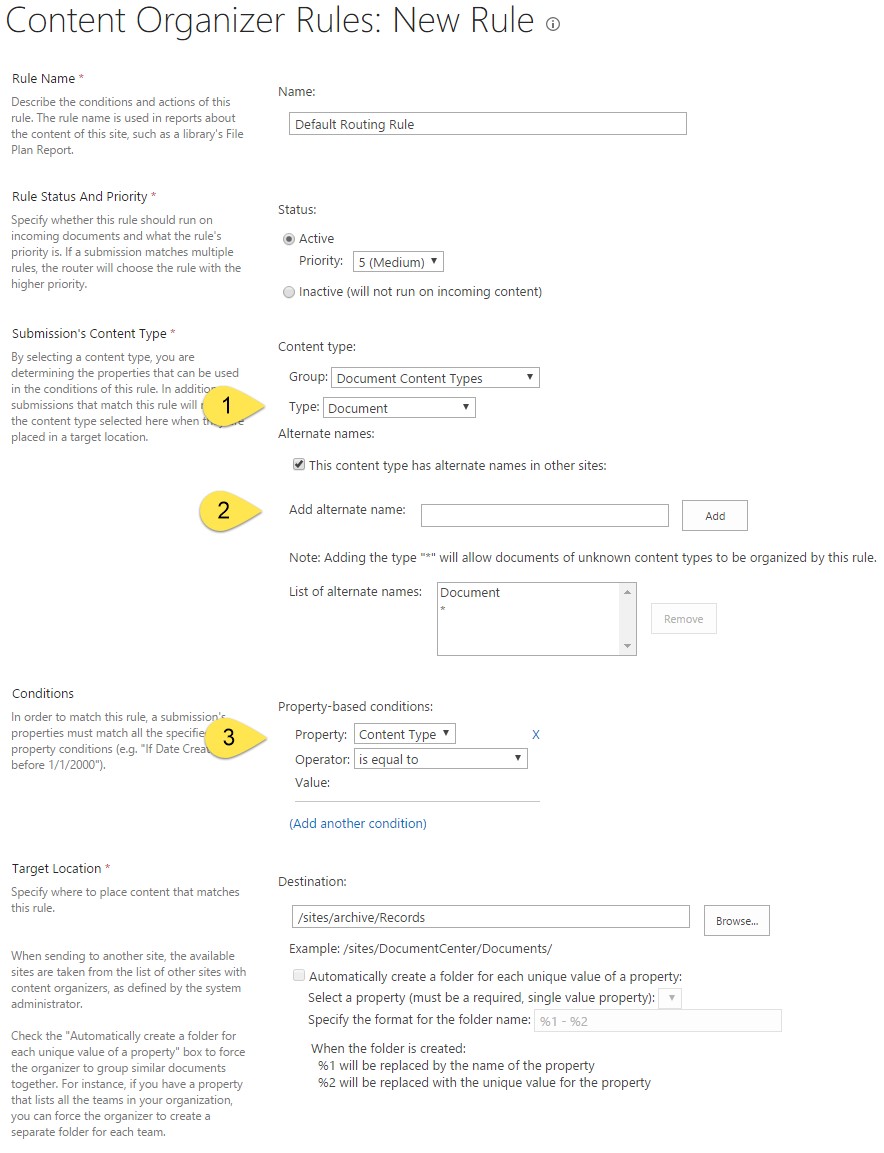
Click OK to save your new rule.
And you are done!
Summary
So now you’ve run the gauntlet and created a basic Information Management Policy for your company: Custom Content Type,
Retention Rules, Records Center, Connections for Sending to the Records Center, and Content Organizer Rules.
Take a quick breather, because the next phase is extending your Document Advanced content type to give your company more control over your documents and how they are managed. These issues will be covered in future postings.
At 2 Plus 2, we specialize in helping enterprises like yours build terrific, fully-realized SharePoint intranets. If you are interested in working with our team to learn how to unlock the power of a great employee intranet, go online to schedule a free consultation with our team or call 510-652-7700 today.